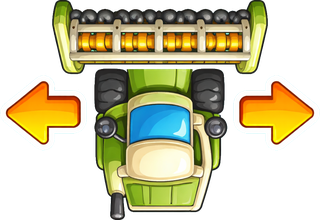
Row Gardener
When swapped, clears the entire row of 8 tiles — obstacles inside the row are hit too.
The most common question we get is “how do I get 3 stars?” The short answer: chain cascades, save your power-ups for tough boards, and finish the level with moves to spare. Here’s the long answer.
Every level has its own three score thresholds — one for each star. The thresholds are tuned per level, so a 3-star score on Level 1 is very different from a 3-star score on Level 50. You can see the targets right on the level’s start screen and in the in-game HUD.

Reach the level’s first score threshold and complete the goal. You’re guaranteed at least one star on any win.
Hit the second threshold. Usually means you took advantage of at least one cascade or power-up along the way.
Hit the third threshold — usually rewards multi-power-up combos and finishing with moves to spare.
Once you’ve cleared all 50 levels with at least one star, Bloom Garden quietly switches into 3-Star Cleanup mode — a relaxed end-game pass focused on perfecting your rating on every level you haven’t yet 3-starred.
After you finish your last 1-star level, the game shows a one-time celebration banner the next time you complete a level. From then on, the post-level screen gains a ⭐⭐⭐ Next button that jumps you straight to the next level you haven’t three-starred yet — no need to scroll the level map looking for the gaps.
Cleanup mode keeps suggesting the next imperfect level until every single level on your save has three stars. After that, the Perfect Garden achievement is yours. Then it’s just you, the garden, and the high-score leaderboards.
Match more than three blossoms to grow a power-up. The shape of the match decides which power-up you get. Power-ups stay on the board until you swap them, so you can save them for a tough goal — or chain them for a bigger payoff.
When swapped, clears the entire row of 8 tiles — obstacles inside the row are hit too.

When swapped, clears the entire column of 8 tiles top-to-bottom — great for digging through stacked obstacles.

When swapped, clears a 3×3 area centered on the bomb — the most reliable answer to a clump of obstacles.
When swapped with any blossom, clears every tile of that color across the whole board. Save these for goals that need a specific flower.
The really big scores come from swapping two power-ups directly into each other. Each pair triggers a unique combo — some clear three rows or columns at once, some explode a 5×5 area, and one clears the entire board.
+
Mega Row Wave
Three full rows (the swap row plus the rows above and below).
+
Mega Column Cascade
Three full columns (the swap column plus the columns to either side).
+
Cross Blast
A plus-sign of clears centered on the swap — one full row plus both columns.
+
Mega Harvest
A 5×5 area centered on the swap — obstacle-killer.
+
Explosive Row
A 3×3 area plus three full rows. Tremendous on cluttered boards.
+
Explosive Column
A 3×3 area plus three full columns.
+
Rainbow Row
A full row clear, plus every tile of the swapped color across the board.
+
Rainbow Column
A full column clear, plus every tile of the swapped color across the board.
+
Rainbow Field
A 3×3 area, plus every tile of the swapped color across the board.
+
Full Bloom
The entire 8×8 board. The biggest move in the game.
Combos only fire when you swap two power-ups together. A power-up that gets caught up in a cascade still triggers its single-power-up effect, but doesn’t form a combo.
New worlds bring new obstacles — each one changes the way you plan a move. Here’s every obstacle in the game and exactly what clears it.

Stones don’t move and don’t clear. They split a column into segments — tiles below a stone can’t fall past it, and new tiles only refill above it. Plan around them: use Row Gardeners to clear straight across, or a Bomb to hit the tiles right next to a stone.

The first time a match touches an ice tile, the ice cracks. The second adjacent match shatters it. You can still swap and match the blossom under the ice while it’s frozen — the ice is a layer on top, not a wall in front. Power-up clears count as matches.

A chained tile is locked — you can’t swap or match it — until you make a match in an adjacent square. Each adjacent match strips one chain layer; once the last layer comes off, the tile is free and behaves normally. Bombs and other power-ups that clear a neighbour also count.
Whether you’re still working through Spring Sprouts or chasing your last 3-star in Cleanup mode, these are the habits that reliably turn good levels into great ones.
Before you make your first move, scan the board for a swap that creates a match-4, match-5, or 2×2. Plain match-3s are fine, but every match-4+ leaves a power-up on the board for later.
If the goal needs a specific color, save Rainbows for that color. If the goal needs a row of obstacles cleared, save Row Gardeners for that row. Bombs are best for a tight clump — especially ice, chains, or hard-to-reach corners.
The combo multiplier climbs every time a single move triggers another match. Long cascades unlock 3x, 10x, and 20x combo tiers — that’s where 3-star scores usually come from. Look for moves that drop tiles into pre-existing near-matches.
Two power-ups in adjacent squares is almost always worth swapping together — even modest combos like Row+Row clear three full rows and tend to start a cascade. The biggest single move in the game, Rainbow + Rainbow, clears the whole board.
Speed matters: completing a level with at least 5 moves remaining earns the Speed Bloomer achievement, and unspent moves also feed into your end-of-level bonus. If the goal looks like it’ll be tight, focus your power-ups on closing it out quickly — the score from leftover moves often makes the difference between 2 and 3 stars.
Stones split columns — tiles can’t fall past a stone, so a board full of stones means cascades happen in narrow strips instead of long chains. On those levels, Row Gardeners and Bombs tend to outperform Column Gardeners and Rainbows. The opposite is true on open boards.
Tap the question button in the HUD to highlight a suggested move. If the board has no possible matches at all, Bloom Garden will shuffle automatically — you won’t lose a move.
The fastest way to internalize all of this is to replay an early level you’ve already beaten and try to 3-star it with a single big combo. Once that clicks, the rest of the garden falls into place.